


There is no match for the aroma that you get while baking Pesto Bread (savory Babka bread) at home. And that aroma makes you want to bake it repeatedly. Of course the taste too. It is extremely soft, moist, and light and the best part of this bread is that it stays fresh and soft for three days. Generally, homemade bread starts to dry out the next day. But not this one because it is made of a popular Japanese technique – Tangzhong or water roux method – that helps in increasing the shelf life of homemade bread. This process makes it springy and spongy. The bread has great elasticity that it bounces back after pressing.
If you like this recipe, you must try our Ladi Pav (Dinner Rolls) recipe and Homemade Bread Loaf recipe too. Both of these breads are made with the same technique. In fact, they have the exact same dough.
To understand the step-by-step method to make the dough, you may check out this video.
Story Time
I never thought that I would ever make bread at home. It always seemed quite daunting to me. I also thought that if I need to make bread, I would go for something fancy like Italian Focaccia bread, or cinnamon sugar donut. But after trying my hands on ladi pav or dinner rolls, I got so much interested in making bread at home that now I literally do not feel like buying bread from the stores. Ah! It is not good. I blame my favorite Kenwood Stand Mixer. It has made my job so much easier and more fun. I can keep looking at it kneading the dough until finished. It is fascinating and such a therapy.
Recently I decided that I need to overcome my fear of making bread at home by making more and more bread at home. I decided to make bread every weekend. Then the idea came up to MASTER ONE DOUGH first and make different kinds of bread using the same dough. For that, I picked up my ladi pav bread dough. I want to make this dough repeatedly until I get comfortable with it. That is why, in this recipe, I used the same dough and turned it into braided pesto bread. And this bread is heavenly good. It is so soft that one slice of it feels like a bite. And it tastes superb. You do not need to toast or apply butter or cream cheese to it. Just slice and enjoy. We loved it a lot.
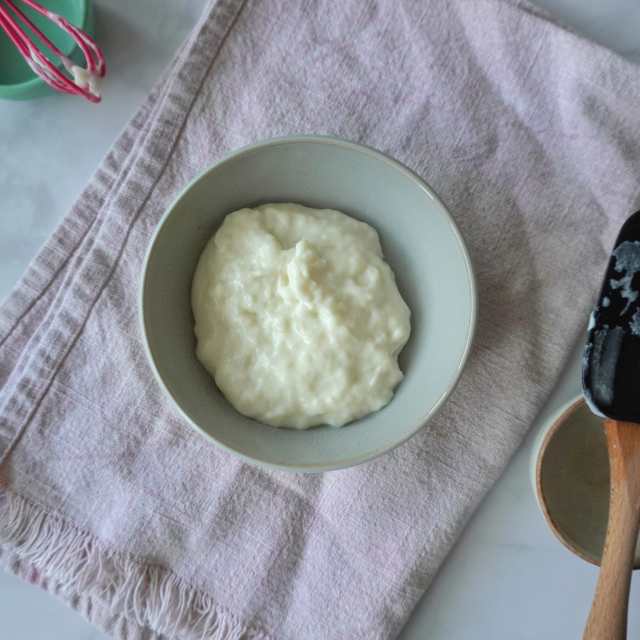
What is Tangzhong or Water-Roux?
Tangzhong or water roux method is a Japanese technique that is used to make soft and moist bread – dinner rolls, sandwich bread, and milk bread. In this method, a portion of flour and milk/water are mixed together and cooked on a low flame until a thick gel-like consistency is achieved. This mixture when cooled is added to the remaining ingredients of the bread and mixed together. With this method, two things are achieved:
- It makes the bread much softer and tender.
- It increases the shelf life of the bread. The bread remains soft and moist for longer compared to the ones that are made without Tangzhong.
How does Tangzhong technique work?
Tangzhong creates a structure that can hold more moisture throughout the process of kneading, baking, and cooling. It means that:
- The bread may rise higher because of more water/liquid, hence more steam resulting in more rise during baking.
- Since it has more moisture, the bread will ultimately be more soft and moist and remain softer for longer.
You can read more about it here.
Tips to bake it right
- Room Temperature: Make sure that all the ingredients are at room temperature. It is very important in baking.
- Measure Accurately: Correctly measuring the ingredients is very important. Adding extra flour is one common mistake. Just fill your measuring cup with flour using a spoon and then level it off with a knife. Or, if you are into baking then I would recommend investing in a kitchen scale. It makes the work much easier.
- Sifting: Sift the flour. This ensures that there are no lumps in the dough.
- Overmixing: This is something that happens accidentally. Over-mixing the dough makes this bread hard and it does not rise enough. If you are kneading by hand, knead until it becomes soft and smooth. And if you are using a stand mixer, knead till it starts to leave the sides (not completely though). Touch the dough with your finger. If it doesn’t stick, that’s your clue to stop kneading.
- Milk Temperature: Make sure it is lukewarm – neither hot nor cold. If it is too hot, it will kill the yeast. If it is cold, it won’t activate the yeast. You should be able to put your finger in the milk. That’s another clue!
Can we replace all-purpose flour with whole wheat flour?
This is the most common question. In order to make things healthier, we feel like replacing refined flour or all-purpose flour (maida) with whole wheat flour. But it doesn’t work that easily. Baking involves science and maths too. Replacing one ingredient and keeping other things exactly the same won’t give you the same result or in fact, may ruin the bread.
Every flour has a different protein content which gives different results in bread baking. The higher the protein, more will be the gluten formation, and hence the higher will be the rise. You may think that whole wheat flour has more protein so it should have more rise. But whole wheat flour contains fibers and bran which cuts the gluten formation. This leads to low-rise and denser and dry bread.
In order to achieve good results with whole wheat flour, try replacing 25% of the refined flour first and then gradually proceed. Whole wheat flour will need more moisture to soften the bran and hence will give good results in terms of softness and rise.

Can we replace toned milk (1.5% fat) with full-fat milk (3.5% fat)?
Just like whole wheat flour, different milk also has different protein and fat content. This difference plays a huge role in the texture and overall result and experience of the bread baking. I baked this recipe using toned milk that gave me soft and moist bread. Also, it resulted in a higher rise in bread.
Switching toned milk with full-fat milk affects the protein and fat content of the bread in a way that it becomes difficult to knead the dough. I tried this and it took me around 60 minutes to knead the dough using a stand mixer and eventually, I had to dust some flour to make it come together. Though the dough looked good and was proofed well. But the overall result was dry and hard bread because of extra kneading.
What happens if we over-knead the dough?
Over-kneading is another mistake that we should avoid. It results in hard and dry bread. Once you knead the dough for a little extra time, it becomes extremely difficult to manage it further. It even becomes impossible for the dough to come together.
There are a couple of things that you can follow to make sure that your bread is well-kneaded:
1) Non-Sticky Dough: The other two methods below are the foolproof way to check if the dough is done but there is one more way to check if the dough is just perfect. If you are using a stand mixer, you will notice after a while that the dough starts to come together (not sticking to the sides and starts to clean the bowl) and looks smoother. At this stage, touch the dough with your finger. If it sticks to your finger, it means you need to knead more. If it doesn’t stick, try the window-pane test to be sure.
2) Window Pane Test: This name sounds funny but it is actually how it sounds. To check if your dough is done, take a piece of your dough and stretch it gently. Put it in front of the window or some light source in general and if you can see the light through the dough, it means it is done. If the dough is breaking while stretching, it means it doesn’t have enough gluten to hold it. Knead further till it passes the window-pane test.

(Image credit: Apartment Therapy)
3) Bounce Back: Once the dough is done, shape it into a smooth dough ball and gently press it with your finger. If the dough bounces back (not completely though), it means it is perfectly done.
Can we knead the dough with our hands instead of using the stand mixer?
You can surely knead the dough using your hands but I would not recommend it since this dough takes a lot of time to become smooth. It is a high-hydration dough which means that it has a lot of moisture/liquid. Kneading using the slap-and-fold method is doable if you are ready to invest some time and elbow grease.
On the plus side, you will have some good arm exercise if you knead with your hands 🙂
If you don’t have the stand mixer, knead on the kitchen counter. Do not be tempted to dust some flour since the dough will be quite sticky. After some time, the dough will develop gluten and start to come together. Knead until it becomes smooth, elastic, and comes together in the shape of a ball.
How long does this bread stay fresh?
This bread can easily stay fresh, soft, and moist for up to 3 days. After 3 days, it will start to become a little dry.
Store this bread in an air-tight container to keep it soft. You can put them on the kitchen counter itself. To keep the bread for a longer time, store it in the fridge.
How is the Pesto Bread Texture?
When it is out of the oven, it will have a hard surface. But let it cool down completely. After cooling, the bread will become soft and spongy. Press it in between your hands and it will bounce back.
It is extremely soft from the inside and will not crumble on slicing. You may feel that it is difficult to slice.

Is this recipe vegan?
No. I am afraid that this recipe is not vegan or plant-based. But I am working on it. I am working on creating the same dough using the plant-based ingredients and the recipes will start to come out soon. Just watch the space.
If you want some vegan recipes, here are a few options to try: Banana Walnut Muffins, Mini Mango Cheesecake, Vegan Fudgy Brownie.
Step-By-Step Representation of the Bread


Tools Needed
- Stand Mixer
- Kitchen Scale
What kind of Pesto we can use in this recipe?
Below are some of the pesto recipes that you can use to make this bread:
- Wild Garlic Leaves (Bärlauch) Pesto
- Classic Italian Basil Pesto (Vegan)
- Sundried Tomato Pesto
- Spinach and Basil Pesto
More Bread Recipes – just as good
- Cinnamon Buns (Vegan)
- Braided Garlic Bread (video)
- Focaccia Bread for beginners (50% whole wheat flour)
- 100% Whole Wheat Focaccia Bread
- Extremely Soft Bread Loaf
Now you are all ready to make these pillowy soft and moist pesto bread at home, with full confidence. It looks so fancy and stylish that you will get a lot of appreciation from your family and friends. Grab all the ingredients, and let’s get baking.
If you like the recipe, please share the photo on Instagram and tag us too @thefearlesscooking. We love to see your recreation of our recipes.
Happy baking 🙂
Love from us
Richa


Tell us what you think